
THE SPICE IS RIGHT!
SHOP NOW!
52
Days22
Hours12
Minutes42
Seconds Until Labour Day
We’re transforming a dingy storage shed into an idyllic space, a getaway for weekend guests. For those needing a springboard about the terminology, let’s start with the word:
BUNKIE (noun) bunk·ie /ˈbʌŋki/ – A small cabin used for extra space on a cottage or home property. Often houses bunkbeds.
Of course, the layout of a bunkie can include a cozy sitting area, a dining space, or even an office area to work or study at a makeshift desk. Yet it’s the sleeping area within that often transforms these simple, humble structures into the most charming getaways for guests.
Our initial idea was to demolish the old shed and replace it with a brand new bunkie built from some online plans. But, as every weekend warrior and DIY-enthusiast will attest, expect the plans to change. We think you’ll agree that our alterations were for the better.

The cottage itself has three bedrooms, each with a queen bed, dresser, bedside table, lamp, curtains and vintage accessories. One of the bedrooms is also big enough to allow for an inflatable queen mattress if I move some furniture around. So all in all, my cottage can sleep eight guests, which is amazing but… I wanted more. With so many hosting opportunities, there have been weekends when friends crashed on the couch, and sure, every once in a while, someone sleeps outside in a tent. But as the idea for a guest cabin took hold in my mind, I started planning. Keep reading and you might just find these interior design ideas work for your cottage too.

Before I could tear down the existing smaller shed and build a new bunkie, I needed to find a place to store everything: lawn equipment, gardening tools, refuse containers and even boxes of Christmas decorations. It seemed essential to build a new, larger shed to accommodate the lot. Click to watch the VIDEO showcasing the building of that storage shed. That post on HOW TO BUILD A STORAGE SHED shares my experiences on the very first structure I ever built. Truth!
I downloaded plans from the internet, ordered all the materials from a local building supply company, and then relied heavily on family and friends to assist with advice and brawn. The result is a large, solid structure with enough room for my lawnmower and wheelbarrow, plus a canoe, kayak and all my storage boxes of props, books and various sundries.

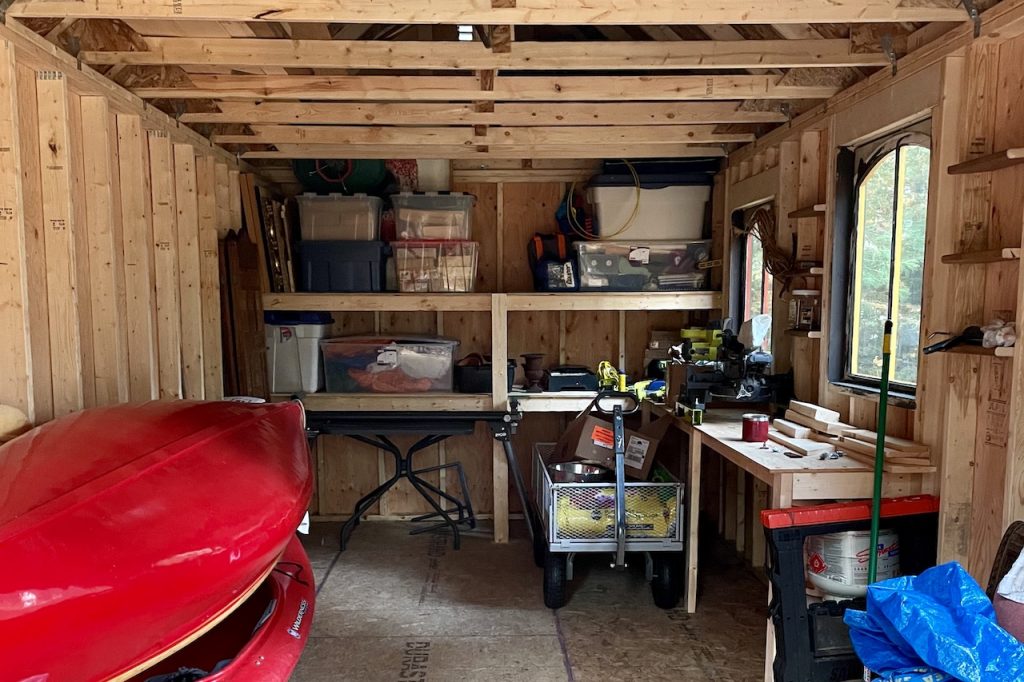
With the new shed built—and thankfully exceeding even my expectations—it was time to move on and build the bunkie. The old shed was divided into two halves, a smaller front for yard tools and a larger back half that was apparently used as a sleeping space. Between us, I seriously doubt anyone had slept there in a long, long time (except maybe some spiders). The simple plank doors were falling off the hinges, the drywall had never been finished, and the entire structure was downright derelict.

With plans in hand for a 12 x 10-foot cabin, we set out to reorient the opening so that it faced the lake and add two windows with views, one to the forest, the other to the lake. I ordered sliding glass doors and the two large windows right away because, you know, these things take time.

My brother-in-law Steve, who has a ton of experience (and patience!) doing DIY projects and builds, joined me as we started the demolition. The old pine board and batten was peeled from the exterior, the drywall was pulled away, and a serious pile of refuse for the dump was left in our wake.

I’ll never forget the moment Steve said, “You know, this is really well built!” Then he started walking around with a level, “I mean, look how solid this is. Everything is perfectly level. Look! It’s completely plumb!” And then came those magic words every renovator wants to hear:
“Maybe we don’t need to take the whole thing down.”

Comparing the new plans to the old frame, it looked like it might just work. In fact, retrofitting the old structure not only saved a ton of time, work and money, but from my perspective, we also saved some of the original charm of the old cabin. I bet the folks who built that old shed would be mighty proud.

With the structure stripped, we were ready to reframe the walls to accommodate the rough openings for the door and windows on order. We even managed to add two smaller windows to flank the sliding doors, increasing both ventilation and natural light.

Once the reframing was done, we added sheets of plywood to the exterior to close the space. This simple way of cladding the exterior mirrors what was done when we built the NEW SHED.

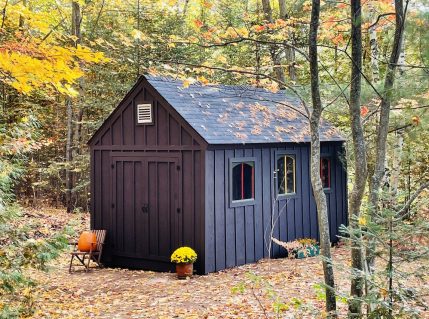
Adding furring strips finishes this look perfectly, and when stained a dark OXFORD BROWN ES-67, gives the bunkie a unified look with the new shed and the cottage proper. The brown also plays well off the greenery surrounding the property.

I take full responsibility for deciding to remove and replace the roof. Once the exterior was stripped, I kept looking up at the wooden beams and particleboard. Although the beams were perfect, that particleboard? It might be fine for a utility or wood shed, but this bunkie needed a strong roof if guests were to sleep under it. The solution? Strip off the old asphalt shingles and particleboard and replace them with… the old exterior pine plank cladding. Brilliant!

Inverting these pine boards on the ceiling saved them from the local landfill, plus they’re more solid and durable than particleboard or plywood.

Once the new planks were nailed in place, we covered them with roofing tar paper. To save even more time, I called in the same roofing company that had just replaced the roof on the main cottage.

In just an hour, these guys had the new roof nailed in place.

With the installation complete, I went through a paint deck looking at creams with an eye to lightening the space.

We spray-painted the interior ceiling in a creamy white from Benjamin Moore – COTTON BALLS OC-122. I gave the entire process of this new roof a solid two thumbs up.

Thankfully, the original shed already had electrical fed to the structure. Before starting the project, we turned all of the breakers off. Then, once the reframing, new exterior cladding and roof were complete, we called in a professional to add four new wall outlets and four dedicated lights positioned where the bunkbeds would go. Hiring a professionally licensed electrician to look after any rewiring or installing new plugs and outlets is a must – the risk is far too great when it comes to electricity. Finding the four dedicated task lights was a simple purchase through AMAZON.

Adding insulation to the walls of the bunkie and then covering it with a vapour barrier was easy to accomplish. Cutting the panels of thick insulation to size with a sharp blade isn’t difficult, but we do suggest wearing gloves and safety glasses.

The gloves protect against any skin irritation, while the safety glasses help shield the eyes from any airborne fibres and debris. Wearing a mask to prevent the inhalation of those fibres is recommended too! Gloves! Glasses! Facemask!

If you’ve never been to a building supply store or lumber yard in cottage country, here’s a reason to go: you never know what you’ll find. Case in point, I originally thought I’d cover the interior walls of the guest cabin in panelling or shiplap, but settled on a 5-inch pine plank since it was just a little room. I paid for the order and drove to the yard to collect my wood, when suddenly I noticed a pile of even wider planks tucked away in the back of one of their storage areas. The young gent fulfilling the order advised that they were 10-inch planks. A snap decision lead to a classic switcheroo and a price reduction to boot. Most importantly, wide planks make small spaces feel much bigger.

Cutting large pine planks with a table saw is easy, so long as you remember the old adage, “measure twice, cut once”. Fastening it to the walls horizontally is also easy using a nail gun loaded with 2-inch nails. The nails held the planks firmly into the vertical 2 x 4s. Installing the walls took just three hours, start to finish. The pine instantly added warmth to the room.

Once the wall covering was in place, I decided to lighten it up by adding a whitewash or pickled look to the pine. Doing this step before the floor, door and windows were installed is suggested. To apply a pickle finish, mix one part white paint with three parts water, stirring to combine (sounds like one of my RECIPES!). Then dip a square of cheesecloth or a lint-free soft fabric into the liquid, squeezing most of the liquid away.

To apply, run the wet cloth across the pine plank in the direction of the grain until you achieve your desired level of coverage to create lightly pickled, white walls. Apply the finish in a uniform manner. For this treatment, I diluted the same Benjamin Moore – COTTON BALLS OC-122 paint that I used on the ceiling.

As mentioned above, adding plywood and furring strips to the exterior of the bunkie aligned with the look of the shed and cottage. Once stained, the exterior looks nice and finished. The dark brown colour plays well off the shades of bark of the pine and spruce trees. That said, if brown isn’t to your liking, other colours often seen on bunkies, beach houses and rustic cabins include slate grey, red cedar, soft blue and hunter green.

Since this is my second build, I guess I can no longer call it “beginner’s luck” when installing doors and windows. But perhaps the caveat should be: always make sure you follow the manufacturer’s measurements for the rough opening.

Doing so will allow them to slide into place without incident. You may need to add wood shims to ensure the inserts are level. Once the doors and windows are in place and firmly secured to the window header, sill and stud, add the surrounding trim and baseboard. I painted the trim in the same white paint as the ceiling. This created a warm, light look for this bedroom while maintaining its cottage style.

Installing hardwood, tongue-and-groove wood flooring in the bunkie was easier than I thought. Having never installed hardwood floors before, I first checked with a few experts at the building supply, as well as the expert running a local machine rental business. Renting a hardwood floor nailer for wood floors and a compressor cost $90 for 3 days, and I used a 5-inch pine hardwood.

Remember Steve’s assessment of how well built the original shed was? Don’t even get me started on the floor: completely level, sturdy, no squeaks. The only prep before nailing the new hardwood in place was to tack down underlayment paper. I used the same paper installed on the roof. This paper prevents moisture from seeping up from the subfloor and also assists the boards sliding more easily when hammered or kicked into place using a mallet and wood blocks.

Once the floor was installed, I sanded it twice, vacuumed and wiped it with a soft cloth to remove any dust. Then I applied a light Minwax stain, Ipswich Pine – 221.

After the stain dried, I applied a water-based satin finish. Laying, staining, sanding and finishing the floor took three days total. I did this all on my own, but some really good coffee and excellent playlists assisted me while I worked.

True confession: not once during the entire project did I stop and think, “How are people going to get up to the door?” I guess I figured I’d just put a few stairs in place? LOL! Thankfully, Steve and my other amazing brother-in-law, Stuart, had other plans.

After I’d added a top coat of satin finish to the floor, they put together a nifty deck complete with stairs leading up from both directions. Getting in and out of the bunkie is a cinch. Crazy how easy they made building the deck seem. It took them just a couple of hours. Thanks guys!

One of the first guests who stayed in the finished bunkie asked, “How did you figure that out?”, referring specifically to the bunk beds. Well, whenever I start a project, I do my research; as my family says, I “go down the rabbit hole”. In this case, trying to find bunk beds made with natural materials had me looking everywhere, until I saw a photo from a back issue of a design magazine with the caption, “handmade by my husband.”

I figured if that guy could make a bunkbed bed frame using 2 x 4s and 2 x 6s, so could we. Steve and I got to work, came up with a plan and voila, homemade bunkbeds.

The interesting thing about these bunkbeds is the way we assembled them. We crafted them so you don’t see bolts or screws. The side bars slide between heavy 2 x 6s on the ends, and we distributed the weight for the mattresses with runs of slatting. Keeping with the look of the interior, the beds are painted in the same white colour. Oh, and best of all, the materials and paint to build two sets of DIY bunkbeds cost under $400.

OK, so yes, we splurged on high-quality mattresses, bed linens and duvets, but for good reason; people who stay in the bunkie must have a good night’s sleep. Before sharing where I sourced everything, let me just say, if antique quilts and vintage textiles are your thing (and if you sew), make your own bedding. For me, though, I needed to start fresh.

The four eco-friendly, bamboo memory foam mattresses came from Amazon. Next, the yellow-striped flannel sheets plus the denim duvet covers came from The Company Store. The actual duvets and pillows are from Crate & Barrel, and the mattress and pillow covers from Walmart. The verdict: best sleep ever!

My sister Dana gets a gold medal in kindness for making my dream come true with unique, one-of-a-kind decorative throw pillows. First, she removed a bunch of old badges from a camping blanket. Then she added more from my days as a Cub Scout and Boy Scout. We even added in a few collected on trips.

Then Dana hand-stitched them onto rectangular linen pillow cases. Each pillow has its own texture and is unique and my goodness, so stunning! They add a certain whimsy to the beds. Absolutely love this important decor enhancement.

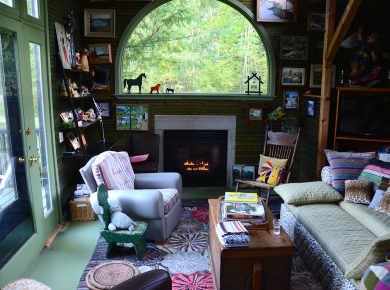
The final few details for our exclusive cottage bedroom makeover, BUNKIE BUSINESS, include the placement of a rustic area rug and the hanging of old vintage lanterns from the ceiling. I also added a few heirlooms: some old paintings, antique books and snowshoes up along the roof-line shelves. Additional cottage bedroom ideas? Add antique dressers, vintage furniture, fresh flowers and wicker baskets. Create a space that offers comfort and joy!

Breathing new life into an old storage shed was the simple plan, but look at this amazing finished cottage bedroom design. A comfy, cozy retreat that sleeps four guests in need of the perfect getaway. Adding a bunkie into the mix is just what this property needed. Yet another reason to enjoy a weekend at the cottage!

An eclectic mix of vintage, antique and found objects to create whimsical cottage decor…
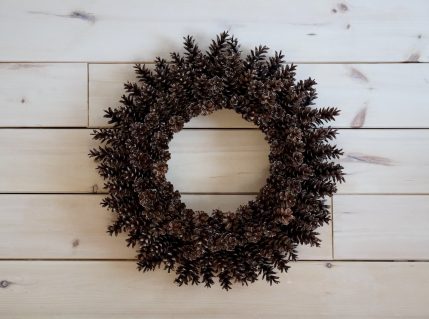
Three different sizes of pine cones gathered together and fastened to a wire create a stunning seasonal decor enhancement…
From foundation and walls to roof, trim and finishing details, let’s build it!

