Preheat the oven to 425°F with the rack in the middle position. Line a baking sheet with parchment paper.
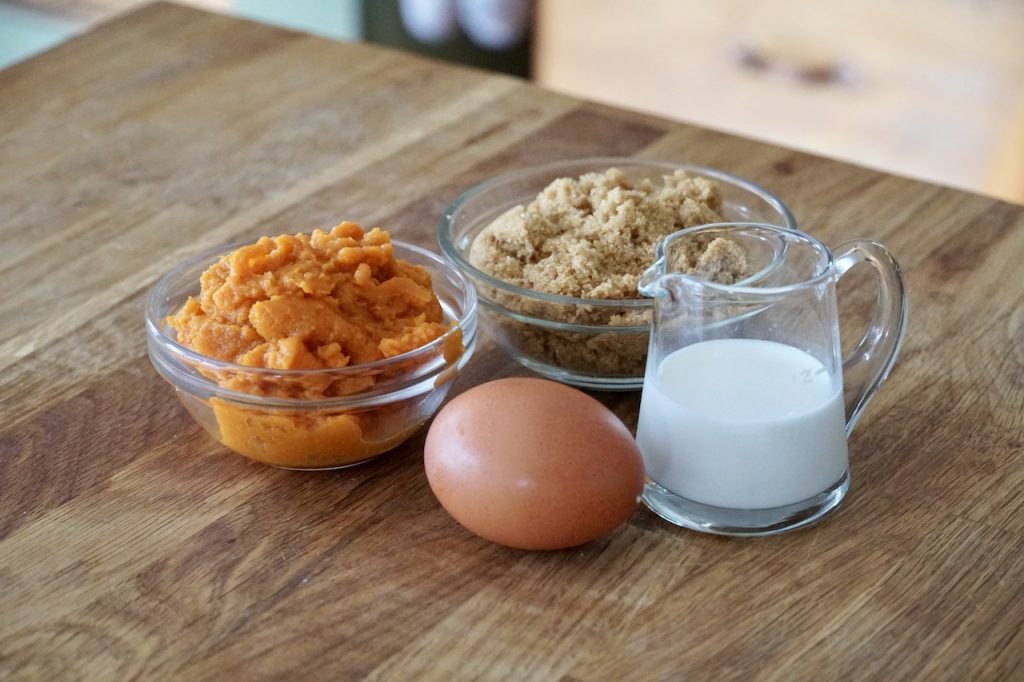
Place egg, brown sugar, cream and pumpkin into a small bowl and stir thoroughly to combine.
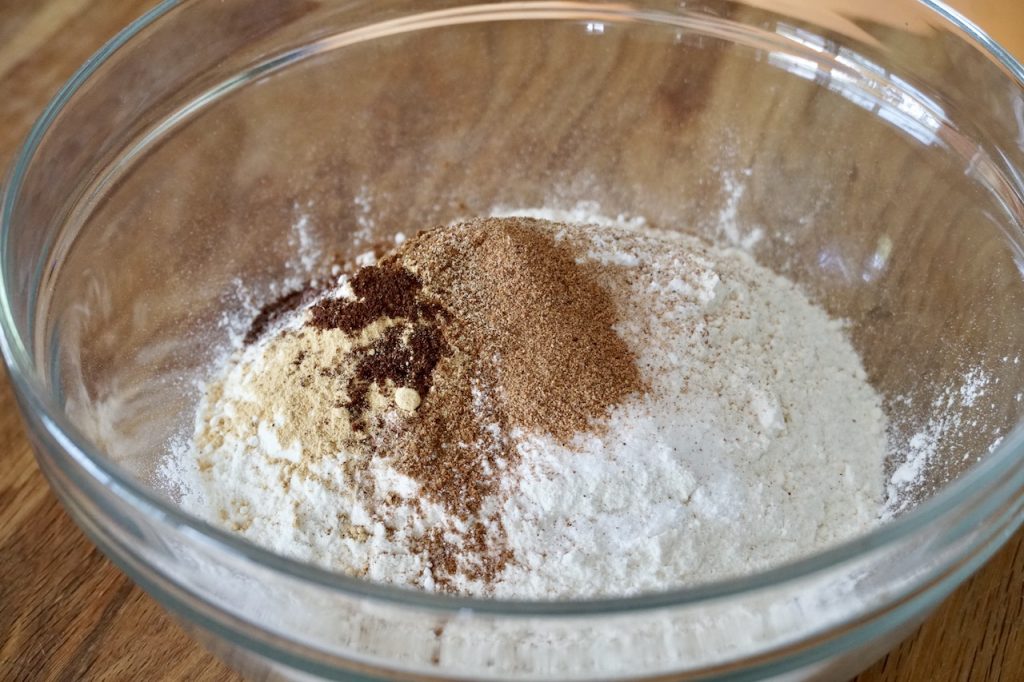
Place all of the dry ingredients into a medium-sized bowl and stir to combine. Transfer dry ingredients into the canister of a food processor fitted with a blade attachment. Add the butter, tossing it in the dry ingredients to coat. Place the lid on the processor and pulse until butter is cut into the dry mix to create small pea-sized balls.
Add the wet ingredients and run the machine on low speed until dough forms.
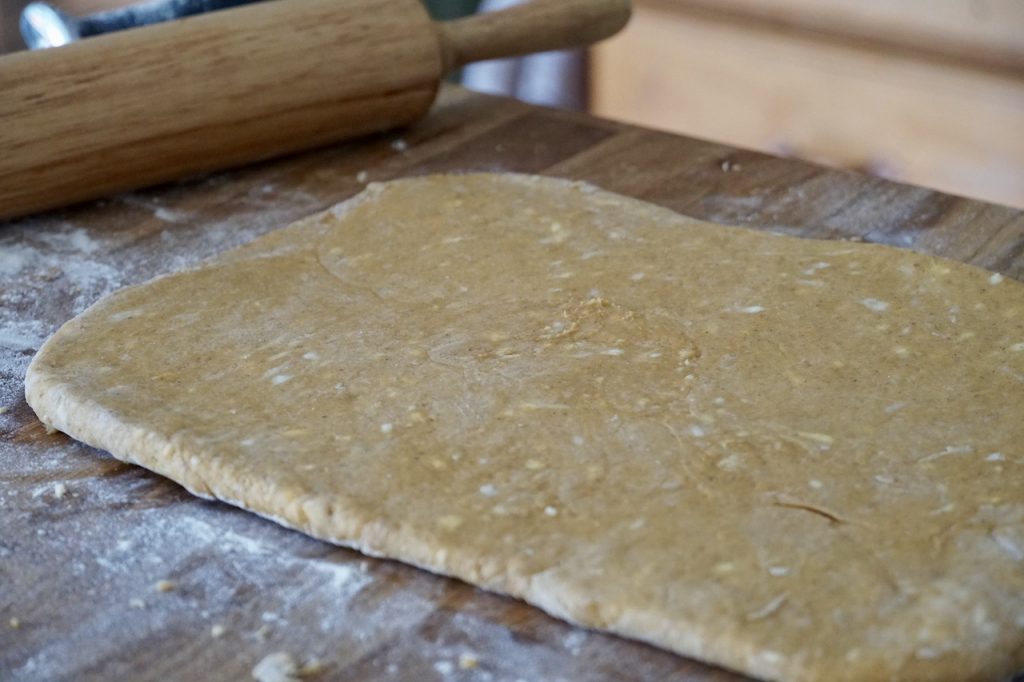
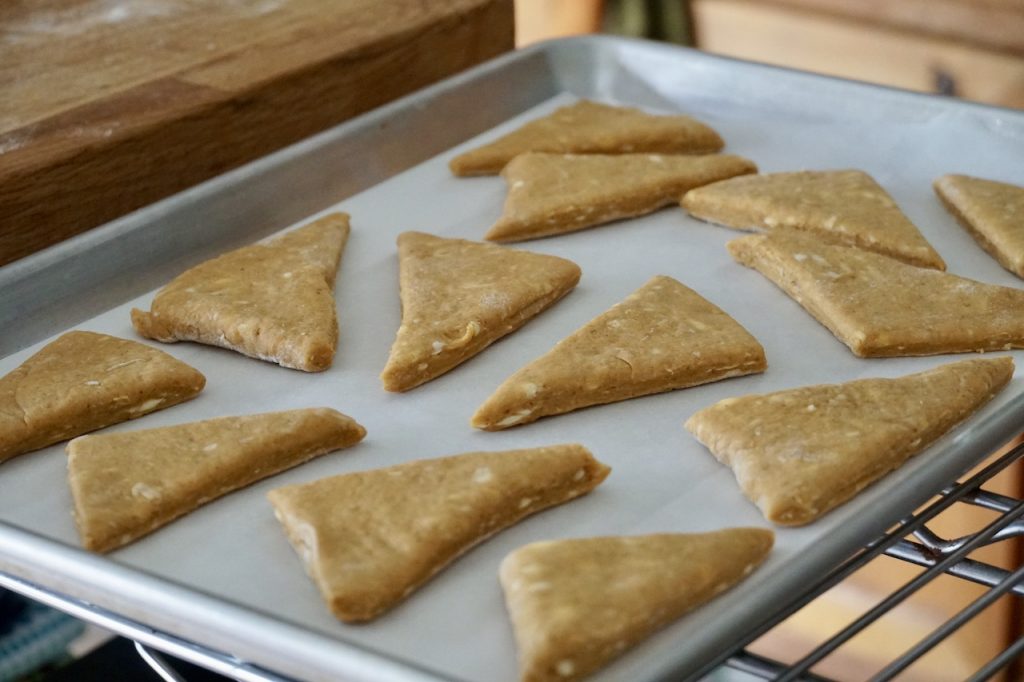
Turn the dough out onto a floured surface dusting the top with additional flour. Knead the dough a few times to gather into a ball shape. Flatten the dough into a rectangle. Using a floured rolling pin, roll the dough out in the same rectangular shape to a ½-inch thickness. Using a pizza cutter, cut the dough in half lengthwise and then into 3 widthwise to create 6 squares. Cut the squares in half on the diagonal to form classic scone triangles.
Transfer scones onto baking sheet leaving ½-inch space between each. Transfer to oven and bake for 13-15 minutes or until tops are a light golden colour.
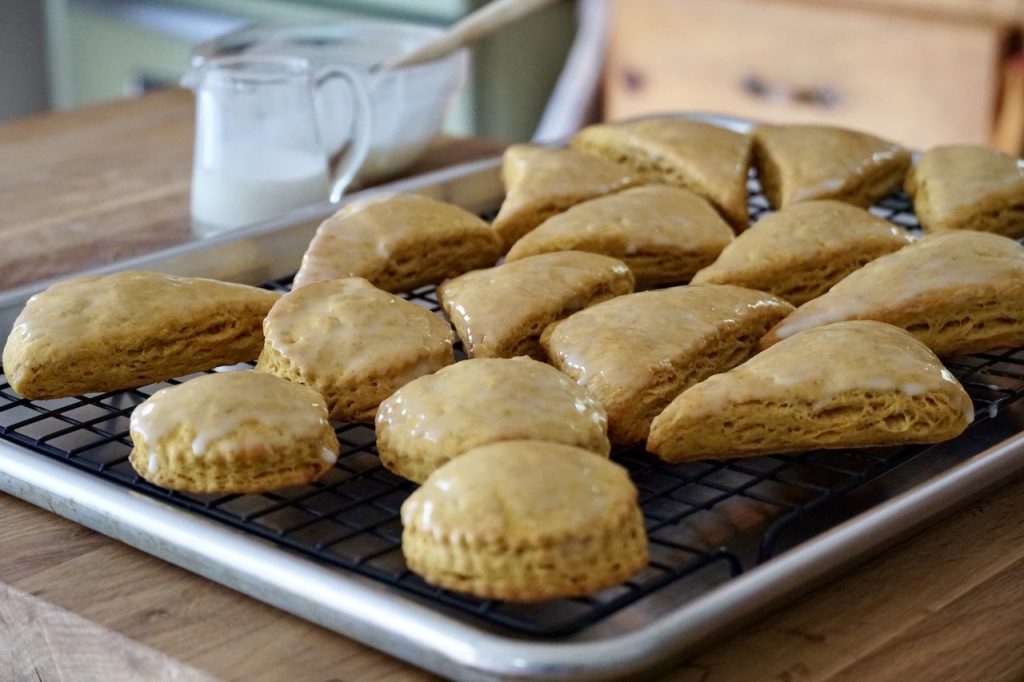
Remove from oven and immediately transfer to a wire rack to cool completely. While scones are cooling prepare glazes.
For the brushed glaze: Place icing sugar and cream into a small bowl and stir to combine. Add a tiny bit more cream if you prefer a thinner glaze. Place rack of cooled scones onto a baking sheet to catch drips. Brush the glaze onto the cooled scones in an even layer.
For the drizzled glaze: Place all of the ingredients into a small bowl and stir thoroughly to combine. Transfer glaze into a piping bag or small storage bag. Snip off a tiny bit of the corner or end of the bag. Squeezing the bag gently, drizzle the glaze in a zig zag pattern by going back and forth over the glazed scones.
Allow glaze to set before serving.
Glazed Pumpkin Scones Recipe
Ingredients
For the scones:
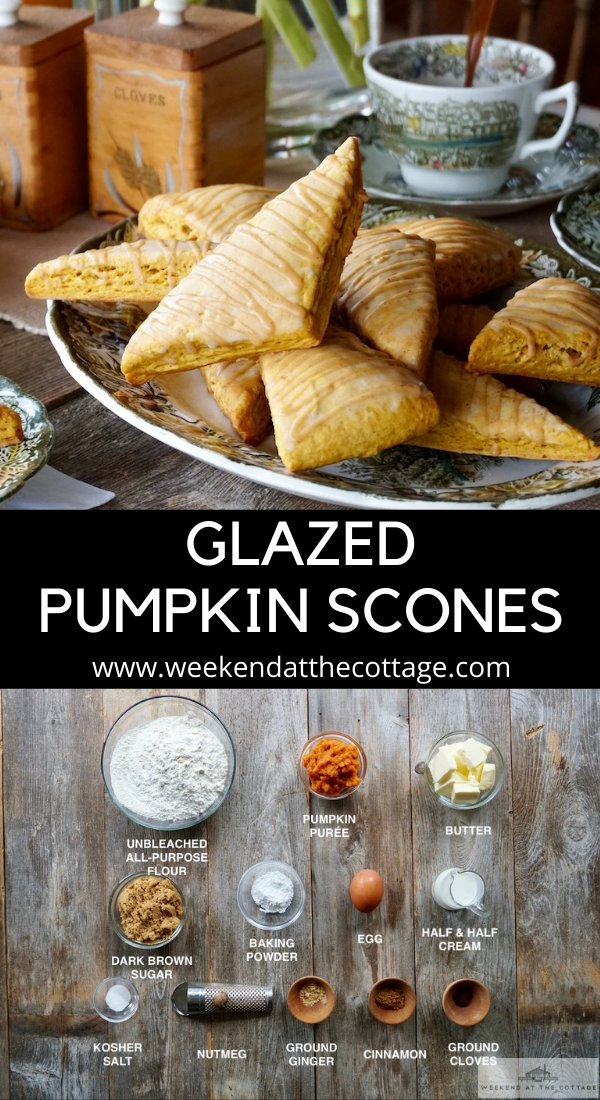
2 cups unbleached all-purpose flour
1 tablespoon baking powder
½ teaspoon kosher salt
1 teaspoon cinnamon
½ teaspoon nutmeg
¼ teaspoon ground cloves
¼ teaspoon ground ginger
8 tablespoons butter
1 egg
7 tablespoons dark brown sugar
3 tablespoons half & half (10% cream)
½ cup canned pumpkin purée
For the brushed glaze:
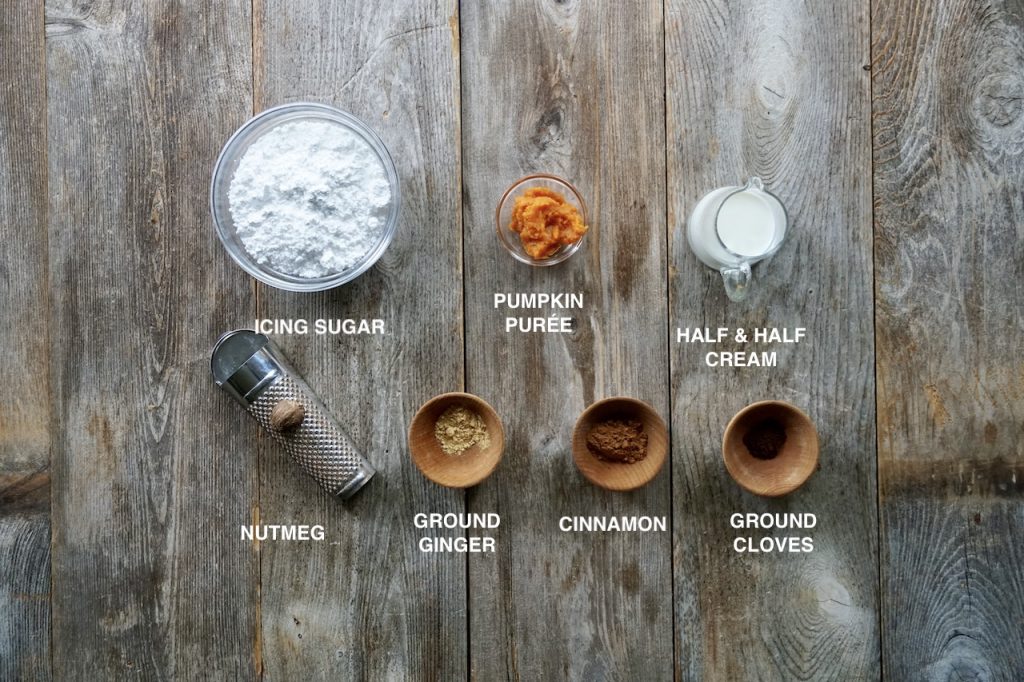
½ cup icing sugar
1 tablespoon half & half (10% cream)
For the drizzled glaze:
1 cup icing sugar
1 tablespoon canned pumpkin purée
1 tablespoon half & half (10% cream)
¼ teaspoon cinnamon
⅛ teaspoon nutmeg
⅛ teaspoon ground cloves
⅛ teaspoon ground ginger
Directions
Preheat the oven to 425°F with the rack in the middle position. Line a baking sheet with parchment paper.
Place egg, brown sugar, cream and pumpkin into a small bowl and stir thoroughly to combine.
Place all of the dry ingredients into a medium-sized bowl and stir to combine. Transfer dry ingredients into the canister of a food processor fitted with a blade attachment. Add the butter, tossing it in the dry ingredients to coat. Place the lid on the processor and pulse until butter is cut into the dry mix to create small pea-sized balls.
Add the wet ingredients and run the machine on low speed until dough forms.
Turn the dough out onto a floured surface dusting the top with additional flour. Knead the dough a few times to gather into a ball shape. Flatten the dough into a rectangle. Using a floured rolling pin, roll the dough out in the same rectangular shape to a ½-inch thickness. Using a pizza cutter, cut the dough in half lengthwise and then into 3 widthwise to create 6 squares. Cut the squares in half on the diagonal to form classic scone triangles.
Transfer scones onto baking sheet leaving ½-inch space between each. Transfer to oven and bake for 13-15 minutes or until tops are a light golden colour.
Remove from oven and immediately transfer to a wire rack to cool completely. While scones are cooling prepare glazes.
For the brushed glaze: Place icing sugar and cream into a small bowl and stir to combine. Add a tiny bit more cream if you prefer a thinner glaze. Place rack of cooled scones onto a baking sheet to catch drips. Brush the glaze onto the cooled scones in an even layer.
For the drizzled glaze: Place all of the ingredients into a small bowl and stir thoroughly to combine. Transfer glaze into a piping bag or small storage bag. Snip off a tiny bit of the corner or end of the bag. Squeezing the bag gently, drizzle the glaze in a zig zag pattern by going back and forth over the glazed scones.
Allow glaze to set before serving.
Glazed Pumpkin Scones Recipe
Loading...
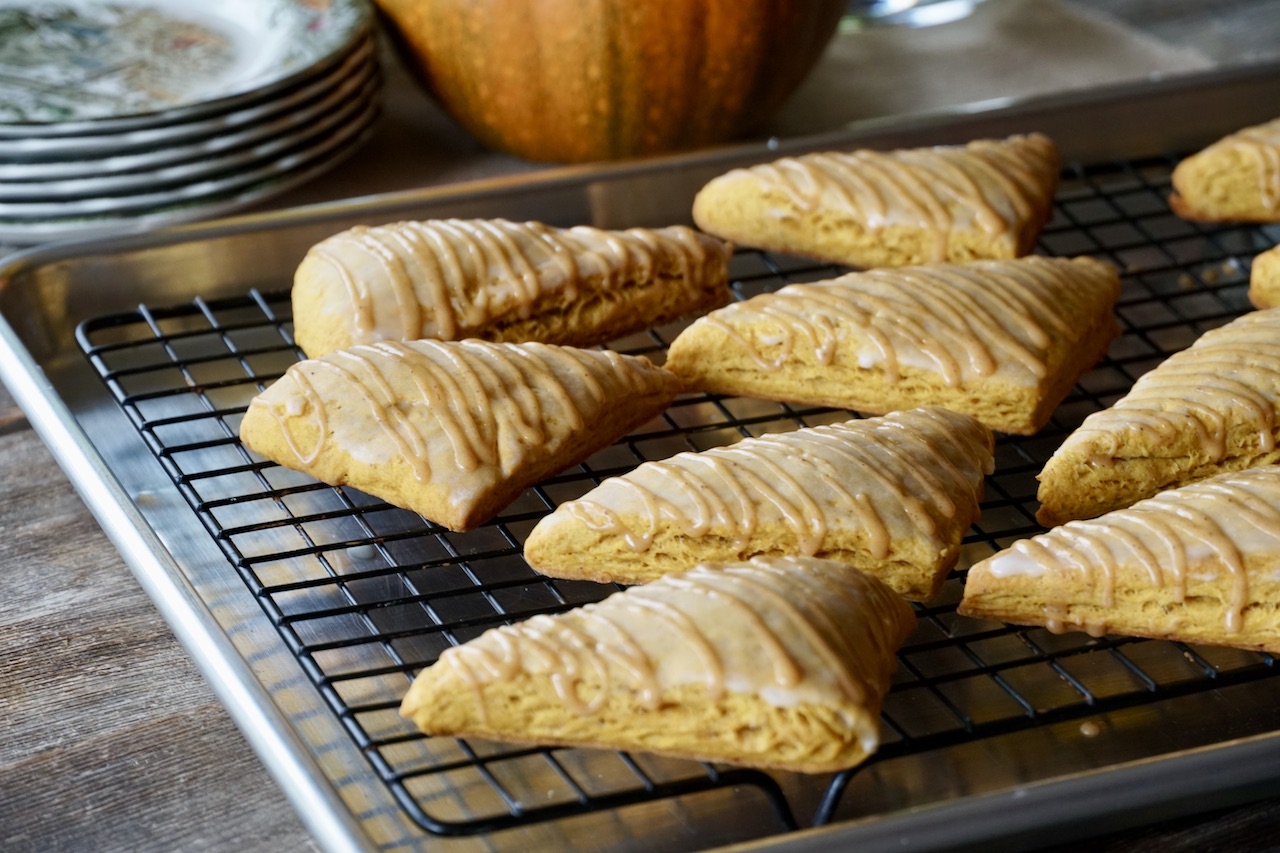
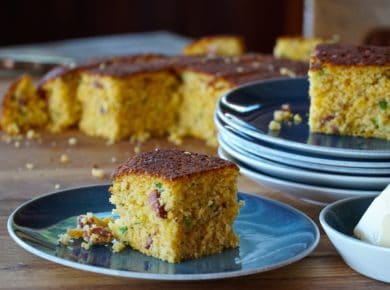
Light and fluffy scones made with puréed pumpkin, flecked with butter and a mix of fragrant spices, then finished with two flavourful glazes…
One bite and you’ll know this truly is the best GLAZED PUMPKIN SCONES RECIPE.
Let me just say, I’m loving everything about this recipe. Not only have we crafted this to be extra easy, but the scones are also soft and fluffy with the perfect balance or pumpkin and spices. Of course, they’re also visually appealing with not one but two glazes. It makes this entire adventure in homemade scone making so wonderful and rewarding.
Let’s do a big shout out to my sister Maria who graciously offered to share this recipe with WATC. Working it through the test kitchen, I only changed a few things, LOL! I mean seriously, all I did was add a bit more butter, a tiny bit more cinnamon and then, I did the two glaze business giving these scones a bit of snazz! Who would object to that? Thanks Maria – your scones are almost as awesome as you are! XO
Because pumpkin scones can be enjoyed as a light breakfast, midmorning or afternoon snack, or an after-school treat, we know you’ll be making them often. Best to PIN the recipe to a favourite board plus SHARE this recipe with friends. Please also remember to post pics of your scones on your favourite socials, tagging #weekendatthecottage when you do!
Here’s how to make our GLAZED PUMPKIN SCONES RECIPE:
INGREDIENTS
One thing that I love the most about this homemade scones recipe is the fact that I already have the dry ingredients and spices in the pantry. After that, all you need is an egg, some half & half, butter and pumpkin purée. Honestly, getting everything ready to make the recipe could not be easier.
HI DRY
The dry ingredients include unbleached all-purpose flour, kosher salt, spices and baking powder. We found that taking an extra minute to throughly stir all of the dry ingredients together is important. Doing so ensures the baking powder is evenly distributed and reacts with the wet ingredients as they’re added. This gives the scones some serious lift as they bake.
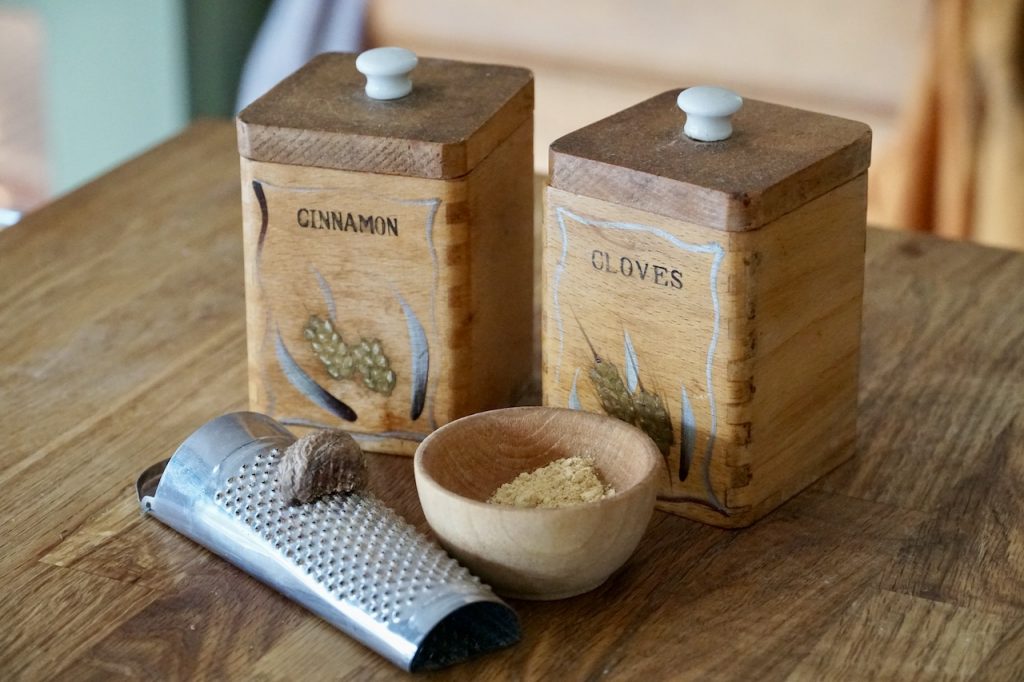
SPICE BLEND
Let’s just step back and breakdown the “spices” mentioned above. Let me assure you, you’re in for a treat. Maria calls for a blend of ground spices including cinnamon, cloves, nutmeg and ginger. They’re all wonderfully fragrant, but each adds a little something extra to the overall flavour of the pumpkin scones. TIP: Keep the spices handy after measuring the quantity needed for the scones. You’ll need those same spices for one of the glazes we’ll be crafting later in the recipe.
FALL FLAVOURS
The blend of pumpkin purée, dark brown sugar, egg and cream always puts a smile on my face; after all, these same ingredients are also used in my favourite SPICED PUMPKIN PIE. For this recipe, we used canned organic pumpkin purée. Sure we could have roasted a sugar pumpkin and smashed up and strained the cooked flesh, but we wanted to keep this as simple as possible. That simple process also had me pulling out a food processor to assemble the dough. Although Maria cuts the butter into the dry ingredients and then stirs in the wet, we found using a food processor reduced the prep time by ten minutes. Truth be told, we were chomping at the bit to make them quick so we could eat them sooner than later. LOL!
DOUGH GO
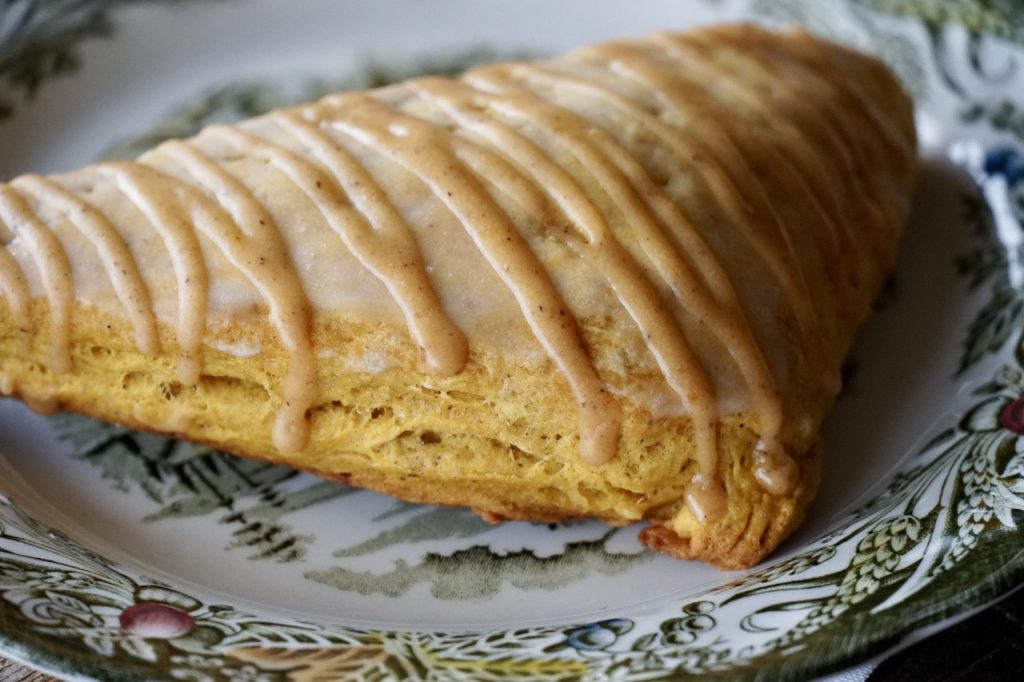
Turning the dough out onto a floured surfaced, whether from the food processor or a bowl, is an easy task. The dough is a bit tacky or sticky, so best to have additional flour at the ready so the dough doesn’t stick to your hands or work surface. We also found rolling the dough out into a rectangular shape about a 1/2-inch thick works best for cutting triangular-shaped scones. TIP: use a pizza cutter to cut the rectangle into squares and then triangles. Sorry for the impromptu geometry lesson!
NEAT SHEET
Baking the scones on a parchment-lined baking sheet works like a charm. Must say I was a bit skeptical of the 13-15 minute bake time, yet it’s spot on. The scones puff up perfectly in the hot oven and you’ll know they’re done when both the tops and bottoms take on a light brown colour. They also smell really fab as they bake too, just saying. Remember to transfer the baked pumpkin scones to a wire rack to cool completely before adding the glazes.
GLAZE ONE
Carol was all excited when we first discussed this GLAZED PUMPKIN SCONES RECIPE. After falling in love with our friend Fina’s BLUEBERRY SCONES, we were both thinking it was time for another flavoured scone. Carol’s only request was, “Can you put a light glaze on these ones?” You bet! A simple mix of icing sugar and half & half is just the thing brushed lightly onto each. Done.
GLAZED OVER
That first glaze got me thinking about those fancy and delicious pumpkin scones touted at trendy coffee shops. I figured we could do a tweak to the first glaze by adding the same spices used in scones plus a spoonful of the pumpkin for both colour and flavour. Applying a zig zag of this sweet and spicy flavoured glaze is easy enough – just use a pastry bag or snip the corner off a sandwich bag.
SHAPE SHIFTER
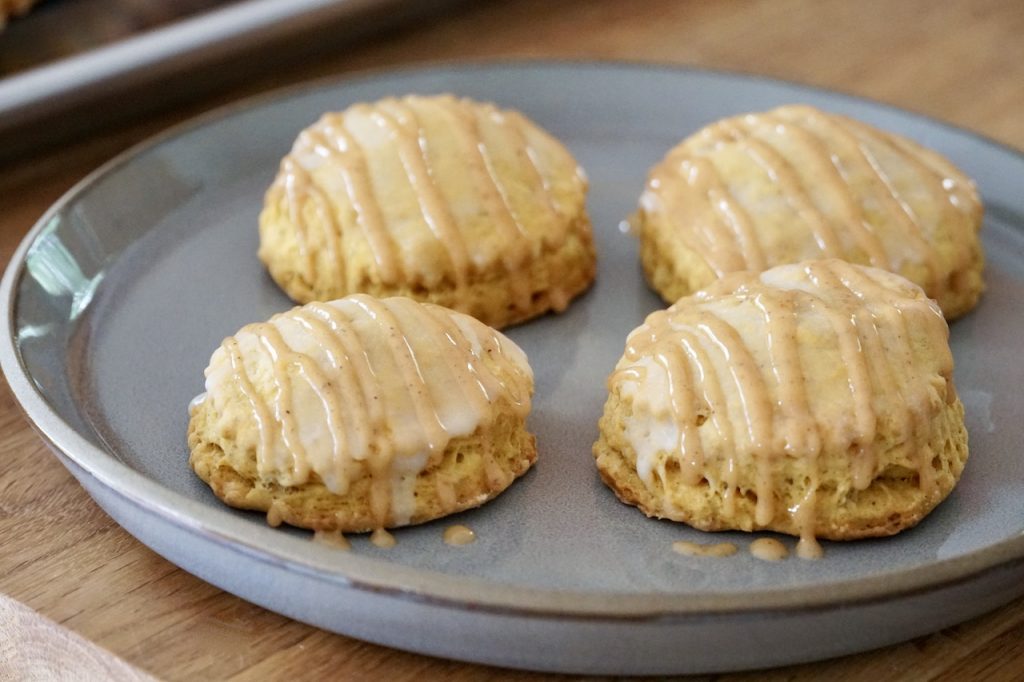
During the testing of the recipe we were preparing a batch and noticed we had a couple of misshapen scones. This got us thinking, would they work if we used circular biscuit cutters? Happy to report it does! We love this slightly smaller scone but also think this dainty version might be perfect for special occasions or afternoon tea. It’s an elevated look if you ever need something a little fancy.
LOOK AT THAT!
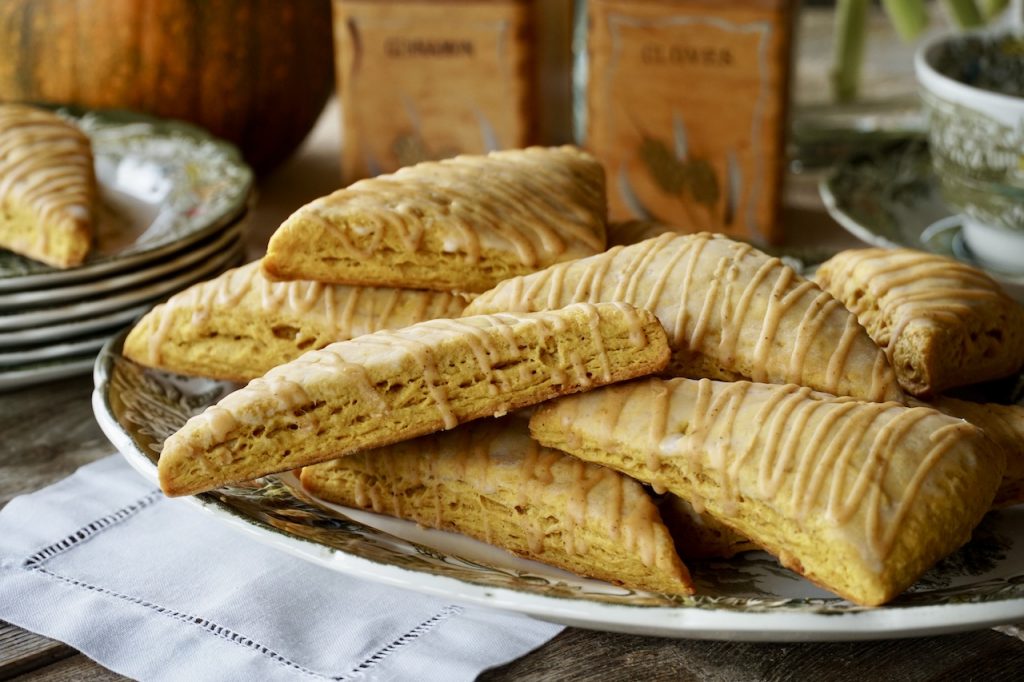
So, not only are these really flavourful baked goods easy to make, they’re stunningly gorgeous too! We suggest serving them with a favourite warmed beverage, whether it’s milk, CHAI TEA LATTE, tea or a robust cup of coffee. Our pumpkin scones are a spicy, sweet and neat treat.
Cook Mode Use cook mode to keep your screen on while cooking.
Ingredients
For the scones:
2 cups unbleached all-purpose flour
1 tablespoon baking powder
½ teaspoon kosher salt
1 teaspoon cinnamon
½ teaspoon nutmeg
¼ teaspoon ground cloves
¼ teaspoon ground ginger
8 tablespoons butter
1 egg
7 tablespoons dark brown sugar
3 tablespoons half & half (10% cream)
½ cup canned pumpkin purée
For the brushed glaze:
½ cup icing sugar
1 tablespoon half & half (10% cream)
For the drizzled glaze:
1 cup icing sugar
1 tablespoon canned pumpkin purée
1 tablespoon half & half (10% cream)
¼ teaspoon cinnamon
⅛ teaspoon nutmeg
⅛ teaspoon ground cloves
⅛ teaspoon ground ginger
Directions
Preheat the oven to 425°F with the rack in the middle position. Line a baking sheet with parchment paper.
Place egg, brown sugar, cream and pumpkin into a small bowl and stir thoroughly to combine.
Place all of the dry ingredients into a medium-sized bowl and stir to combine. Transfer dry ingredients into the canister of a food processor fitted with a blade attachment. Add the butter, tossing it in the dry ingredients to coat. Place the lid on the processor and pulse until butter is cut into the dry mix to create small pea-sized balls.
Add the wet ingredients and run the machine on low speed until dough forms.
Turn the dough out onto a floured surface dusting the top with additional flour. Knead the dough a few times to gather into a ball shape. Flatten the dough into a rectangle. Using a floured rolling pin, roll the dough out in the same rectangular shape to a ½-inch thickness. Using a pizza cutter, cut the dough in half lengthwise and then into 3 widthwise to create 6 squares. Cut the squares in half on the diagonal to form classic scone triangles.
Transfer scones onto baking sheet leaving ½-inch space between each. Transfer to oven and bake for 13-15 minutes or until tops are a light golden colour.
Remove from oven and immediately transfer to a wire rack to cool completely. While scones are cooling prepare glazes.
For the brushed glaze: Place icing sugar and cream into a small bowl and stir to combine. Add a tiny bit more cream if you prefer a thinner glaze. Place rack of cooled scones onto a baking sheet to catch drips. Brush the glaze onto the cooled scones in an even layer.
For the drizzled glaze: Place all of the ingredients into a small bowl and stir thoroughly to combine. Transfer glaze into a piping bag or small storage bag. Snip off a tiny bit of the corner or end of the bag. Squeezing the bag gently, drizzle the glaze in a zig zag pattern by going back and forth over the glazed scones.
 Until Labour Day