2-3 cups pitted and sliced cherries and berries, like strawberries, raspberries and blueberries
To serve:
2 cups fresh berries, puréed
fresh mint or a bay leaves
Takes ,
serves 16.
Instructions
Prepare meringues (day before):
Preheat oven to 250°F. Using a pencil, draw 8 circles, 3-inches in diameter, on a piece of parchment that will fit a large baking tray. Flip the paper over and lay it down on the pan. Repeat once more and set trays aside.
Using a stand mixer fitted with a whisk attachment, beat egg whites, cream of tartar and kosher salt until frothy. Increase speed of mixer to medium then add superfine sugar, 1 tablespoon at a time until all of the sugar has been added. Beat egg whites until very stiff, about 10 minutes.
Transfer meringue to a large piping bag fitted with an open nib or plain nozzle. Pipe concentric circles, expanding outward to fit each drawn circle. Pipe two or more rings around the edge to form a nest about 2-inches high. Transfer to oven and bake for 1 hour. Turn oven off and leave the meringue to cool within for at least 12 hours.
Prepare filling and topping (five hours before serving):
Prepare filling: Using a hand mixer, whip whipping cream until it forms stiff peaks. In a second bowl, blend cream cheese together with sugar and vanilla until light and fluffy. Gently fold the whipped cream into the cream cheese mixture. Fold in the marshmallows.
Gently spoon filling mixture into each nest until it billows out of the very top. Flatten tops slightly. Loosely cover filled meringues with wrap and refrigerate for 4 hours.
To serve: Transfer nests to individual dessert plates. Garnish with a drizzle of a berry purée. Spoon cherries and berries onto each nest. Add a sprig of mint or a bay leaf. Serve immediately.
Cherry-Berries on a Cloud
Ingredients
For the meringue:
6 egg whites
½ teaspoon cream of tartar
¼ teaspoon kosher salt
1 ½ cups superfine sugar
For the filling:
1 8oz. package cream cheese, at room temperature
1 cup granulated sugar
1 teaspoon vanilla extract
2 cups whipping cream
2 cups mini-marshmallows
For the topping:
2-3 cups pitted and sliced cherries and berries, like strawberries, raspberries and blueberries
To serve:
2 cups fresh berries, puréed
fresh mint or a bay leaves
Directions
Prepare meringues (day before):
Preheat oven to 250°F. Using a pencil, draw 8 circles, 3-inches in diameter, on a piece of parchment that will fit a large baking tray. Flip the paper over and lay it down on the pan. Repeat once more and set trays aside.
Using a stand mixer fitted with a whisk attachment, beat egg whites, cream of tartar and kosher salt until frothy. Increase speed of mixer to medium then add superfine sugar, 1 tablespoon at a time until all of the sugar has been added. Beat egg whites until very stiff, about 10 minutes.
Transfer meringue to a large piping bag fitted with an open nib or plain nozzle. Pipe concentric circles, expanding outward to fit each drawn circle. Pipe two or more rings around the edge to form a nest about 2-inches high. Transfer to oven and bake for 1 hour. Turn oven off and leave the meringue to cool within for at least 12 hours.
Prepare filling and topping (five hours before serving):
Prepare filling: Using a hand mixer, whip whipping cream until it forms stiff peaks. In a second bowl, blend cream cheese together with sugar and vanilla until light and fluffy. Gently fold the whipped cream into the cream cheese mixture. Fold in the marshmallows.
Gently spoon filling mixture into each nest until it billows out of the very top. Flatten tops slightly. Loosely cover filled meringues with wrap and refrigerate for 4 hours.
To serve: Transfer nests to individual dessert plates. Garnish with a drizzle of a berry purée. Spoon cherries and berries onto each nest. Add a sprig of mint or a bay leaf. Serve immediately.
Cherry-Berries on a Cloud
5 / 5. 1
Meringue nests overflowing with pillowy soft whipped cream cheese, topped with bright red cherries and assorted fresh berries…
CHERRY-BERRIES ON A CLOUD is this season’s most heavenly dessert!
We want to begin this post by expressing a heartfelt thanks to our dear friend Margie Brown, who recently celebrated a milestone birthday. For the occasion, she served family and friends this scrumptious seasonal dessert. Her portion was presented with a birthday candle, of course, and as soon as we all stopped singing and started eating, I instantly knew it was a dessert I wanted all our WATC friends to try. I asked Margie if she’d share the recipe, and she happily obliged.
The original recipe she gave us is for a layered dessert prepared in a rectangular baking pan. The whole thing is done with an electric mixer, where a meringue crust is spread out as a first layer, followed by heavy whipping cream, and finished with a can of cherry pie filling and a pint of fresh sliced strawberries. The whole thing was cut into square individual portions of the dessert served from the pan. We tweaked a few things in the recipe and adjusted the presentation, and now dedicate this post to CHERRY-BERRIES ON A CLOUD to our dear friend Margie. Hip, hip, hooray!
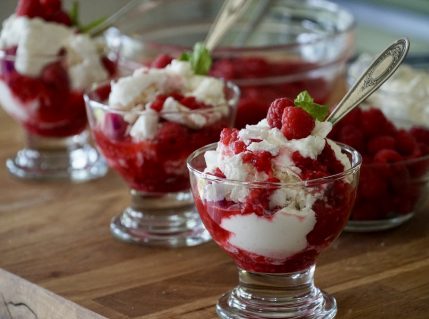
As you read on, we expect those who love desserts made with assorted berries will get excited. For others who love the combination of fresh berries paired with meringue, like in a PAVLOVA or this ETON MESS, go ahead and give us a two thumbs up. Yet, it’s as we bring the whole concept together of meringue nests filled with a marshmallow-ribboned whipped cream mixture topped with berries, we expect our dessert-loving crowd to go wild. Please believe us when we say, you really, really need to make this dessert. As an added bonus, we also present a red and white version for Canada Day, and the red, white and blue version is fitting for the Fourth of July.
One important pro tip before we share all the details on making this dessert recipe: watch the VIDEO first. Everything you need to know is listed below in the ingredients and instructions, but the video captures how surprisingly easy this dessert recipe is to make. We’ve also broken down the details into the three components: meringue nests, cream filling and fresh berries.
Here now are the details on making CHERRY-BERRIES ON A CLOUD:
N.B. — The preparation of this recipe usually takes two days. On the first day, prepare the meringue nests, and then on day two, make the cream filling and fresh berry topping.
MERINGUE NESTS
The meringue portion of this recipe is very straightforward, and we closely followed Margie’s recipe with just one simple adjustment, swapping granulated sugar with superfine sugar, sometimes called caster sugar. More about the sugar in a bit. Additional ingredients for the meringue include kosher salt, cream of tartar and six egg whites. We used large eggs and had them at room temperature. Wondering what to do with the six egg yolks? Try our tangy LEMON CURD RECIPE.
SUPERFINE SUGAR
The above photo shows, from left to right: granulated sugar, superfine sugar and icing sugar. Icing sugar, AKA powdered sugar, is most often used to craft frostings for cakes, while granulated sugar is our standard all-purpose sugar variety. Superfine sugar sits right in between, not too coarse, not too fine. It’s especially perfect when making meringue because the finer granules dissolve easily into the egg whites, creating a smooth, glossy and stable meringue. We used it to make the meringue for our LEMON MERINGUE PIE RECIPE, and guess what? Meringue browned perfectly, and because the superfine sugar fully dissolved into the egg whites, no weeping. Look for it at a bulk food store or baking specialty shop.
TOOLS YOU’LL NEED
We jammed everything you’ll need to make this recipe for CHERRY-BERRIES ON A CLOUD into one photo. First, we recommend whipping up the meringue using a stand mixer fitted with a whisk attachment. Using this essential kitchen appliance makes light work of the process. You’ll also need a hand mixer with beaters to beat the whipping cream and cream cheese filling on day two. Have a large piping bag and a few large open nibs or nozzles at the ready for piping. Lastly, you’ll need two baking trays, parchment paper, a pencil and a glass with a 3-inch diameter opening. The glass is used as a template to trace circles onto the parchment, so your nests are all crafted in a (relatively) uniform size.
HOW TO MAKE MERINGUE
If you’ve never made meringue before, we’re hoping you jump in on this recipe to get your feet wet. Making whipped meringue from scratch is a joyous endeavour. To begin, we carefully separate the egg whites from the yolks, dropping the egg whites into the bowl of the stand mixer, then add the cream of tartar and kosher salt and run the machine on low speed for a few moments to get the egg whites frothy. Once frothy, increase the speed of the machine and start adding that superfine sugar one tablespoon at a time.
Before your very eyes, the viscosity of the egg whites will get white and glossy as they emulsify and aerate. The one suggestion I always make whenever someone asks how to make meringue: don’t rush it. I explain that down below in the directions for this recipe. After the last tablespoon of sugar has been added, run the machine on high speed for about 10 minutes, until stiff peaks form. This ensures you’re left with meringue that holds glossy peaks after piping.
PIPING MERINGUE NESTS
Spoiler alert! You’re going to feel like a professional pastry chef when you do this part of the recipe. It might not be the case after you craft the first one, but remember, practice makes perfect. Start by transferring the meringue into the piping bag fitted with a large nib. The look of an open nib seemed cloud-like to me, but other nibs will work too. Once the bag is full, start by piping a concentric circle onto the first circular trace. It doesn’t need to have height; that first circle just needs to act as the base of the nest. Then continue along the edge, piping circles on top of circles to create sides that are about 2 inches high. The recipe yields 16 nests, so make 8 per baking sheet.
BAKING MERINGUE
Here comes the easy part. Transfer the meringue nests to an oven preheated to 250°F. Bake for an hour, then turn the oven off. Leave the trays of meringue nests within to cool for 12 hours or overnight. Do not open the oven. Leave them be, they’re fine. But, the following day… tada! You’ll be amazed by perfectly toasted meringue nests, soft on the inside, crusty on the outside. Please note, you don’t have to assemble everything at once. You can place baked meringues in an airtight container, keeping them in the freezer until you’re ready to make the filling and serve. They’ll stay fresh and crispy for up to a month.
N.B. — For day two, prepare the filling at least five hours before you intend to serve. This gives the filling time to set within the meringue nest.
CREAM FILLING
The above photo shows the ingredients needed to make the filling, all of which you’ll have no trouble finding at your local grocery store. All you’ll need is 35% cream AKA whipping cream, granulated sugar, vanilla extract, cream cheese and then, one ingredient that even had me scratching my head, mini marshmallows. For best results, have the cream cheese at room temperature before you begin. We also suggest you try a few mini marshmallows before you begin… just to make sure they’re fresh, LOL!
WHIPPED CREAM
The preparation of the filling begins with us whipping two cups of whipping cream in a medium bowl. When making whipped cream, I often do a sprinkle of granulated sugar and sometimes a dash of vanilla extract. In this case, I decided to follow the recipe as written, since some amazing enhancements were soon on the way. When whipping the cream, the goal is to whip until it holds stiff peaks. You’ll want to whip the cream in a separate bowl from the one you mix the cream cheese in.
CREAM CHEESE AND MARSHMALLOWS
Next step is to add the room temperature cream cheese, a teaspoon vanilla extract and the sugar into a second, larger bowl. No need to rinse the beaters from the whipped cream. Simply tap them on the first bowl to knock off the excess, then whip it. Once the cheese mixture is light and fluffy, gently fold in the whipped cream. I did it in three parts, gently folding it in until incorporated. Last step is to add the two cups of mini marshmallows, folding them in much like the whipped cream.
FILLING THE MERINGUE NESTS
The go-forward on adding the light and fluffy cream cheese mixture to the meringue nests is to be gentle. The meringue is pretty delicate and will crumble if you’re heavy-handed. Please follow my lead, using two teaspoons to gently coax the creamy, marshmallowy filling into the nest. You can push the filling down into the cups of the nests gently.
Additionally, add enough filling so that it sits proudly above the edge of the meringue and try to flatten the very top a bit to prepare it for the berries. Make sure to chill the nests after filling so that the mixture sets. This helps the mixed fresh berries cling to it. That’s up next.
CHERRIES AND FRESH BERRIES
In the VIDEO crafted for the CHERRY-BERRIES ON A CLOUD recipe, you’ll see me suggest making this glorious dessert recipe when fresh berries are in season. We suggest you consider making this treat using fresh cherries plus berries such as raspberries, fresh strawberries, blueberries and even blackberries. Yes, of course you can make it throughout the year using imported varieties, but IMHO, locally grown berries in season take the flavour of this dessert from simple to amazing.
Next point, take note of this combination of red berries and how we prepare them. First, we rinse them under cool water. Then the cherries get pitted and sliced, the strawberries get capped and sliced, and everything gets tossed gently together in a bowl. Again, no sugar, flavour enhancements, lemon juice or anything. Just berries.
In this second pic, we created a variation where red berries contrast with blueberries for another colour combination – very striking and beautiful. The sweetness and texture of the berries themselves get our taste buds jumping. Before we show you the final assembly, let’s do a quick sidebar about garnishes for this dessert.
GARNISH
Because you’ll have fresh berries at hand, drop a few into a bowl or the canister of an immersion blender. Zip them up to create a flavourful berry coulis or purée that delivers a little tartness since it’s not sweet. You can drizzle this over the filled meringues right before spooning on your favourite berries. Additional garnish is of course, the berries themselves, plus we think some mint always adds a nice touch. I also did a last-minute pivot and garnished one version with a dinky bay leaf. LOVE! ❤️
FINAL ASSEMBLY
Good news: the presentation of CHERRY-BERRIES ON A CLOUD is so easy, keep it in mind for special occasions like birthdays, anniversaries, Christmas and Valentine’s Day. Gently lift and transfer a filled nest to a dessert plate. Then add a drizzle of the berry coulis over the top followed by a few spoonfuls of your berry mixture. The above photo shows how we used our red berries to craft a red and white version garnished with a bay leaf. LOVE so much! ❤️
Red and white? Hmmm, that sounds like the most perfect dessert ever created to celebrate Canada Day on July 1st. Simply add a little Canadian flag toothpick and you’re good to go.
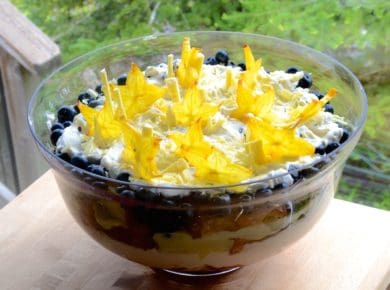
But wait, there’s more. This next pic shows how your glorious, filled meringue nest can look when the berry mix contains blueberries. Talk about appetizing. Who’s ready to dig in?
But that got us thinking… red, white and blue? This is the perfect dessert for our friends in the U.S. Imagine serving CHERRY-BERRIES ON A CLOUD for the Fourth of July? Hooray!
HOW DOES IT TASTE?
We’re hoping you look at the above photo and think, “I’m SO making this!” Every single person who’s tried this version has been blown away. The meringue is so soft and airy, it melts away in seconds. And then that creamy filling is sublime, with notes of a classic, airy cheesecake. Then, every once in a while, you get a little hit of marshmallow – JOY! Finally, the whole thing is partnered with fresh berries, taking it out of this world. The other thing: it’s so light, the portion is easy to enjoy and doesn’t feel like it’s too much. Some folks have even been known to marvel at how light it is and eat two (see Nik blush!). Perfection!
PIN IT!
This scrumptious recipe is so amazing and beautiful, make it and go viral by posting it on Facebook and Instagram with the hashtag #weekendatthecottage. Also, remember to PIN it to a favourite dessert or holiday board on PINTEREST or BOOKMARK this tab for easy access. SHARE it with friends so they can make it too. Thanks!
Now, over to you. Make it! CHERRY-BERRIES ON A CLOUD is your next show-stopping dessert.
Cook Mode Use cook mode to keep your screen on while cooking.
Ingredients
For the meringue:
6 egg whites
½ teaspoon cream of tartar
¼ teaspoon kosher salt
1 ½ cups superfine sugar
For the filling:
1 8oz. package cream cheese, at room temperature
1 cup granulated sugar
1 teaspoon vanilla extract
2 cups whipping cream
2 cups mini-marshmallows
For the topping:
2-3 cups pitted and sliced cherries and berries, like strawberries, raspberries and blueberries
To serve:
2 cups fresh berries, puréed
fresh mint or a bay leaves
Directions
Prepare meringues (day before):
Preheat oven to 250°F. Using a pencil, draw 8 circles, 3-inches in diameter, on a piece of parchment that will fit a large baking tray. Flip the paper over and lay it down on the pan. Repeat once more and set trays aside.
Using a stand mixer fitted with a whisk attachment, beat egg whites, cream of tartar and kosher salt until frothy. Increase speed of mixer to medium then add superfine sugar, 1 tablespoon at a time until all of the sugar has been added. Beat egg whites until very stiff, about 10 minutes.
Transfer meringue to a large piping bag fitted with an open nib or plain nozzle. Pipe concentric circles, expanding outward to fit each drawn circle. Pipe two or more rings around the edge to form a nest about 2-inches high. Transfer to oven and bake for 1 hour. Turn oven off and leave the meringue to cool within for at least 12 hours.
Prepare filling and topping (five hours before serving):
Prepare filling: Using a hand mixer, whip whipping cream until it forms stiff peaks. In a second bowl, blend cream cheese together with sugar and vanilla until light and fluffy. Gently fold the whipped cream into the cream cheese mixture. Fold in the marshmallows.
Gently spoon filling mixture into each nest until it billows out of the very top. Flatten tops slightly. Loosely cover filled meringues with wrap and refrigerate for 4 hours.
To serve: Transfer nests to individual dessert plates. Garnish with a drizzle of a berry purée. Spoon cherries and berries onto each nest. Add a sprig of mint or a bay leaf. Serve immediately.

 Until Labour Day